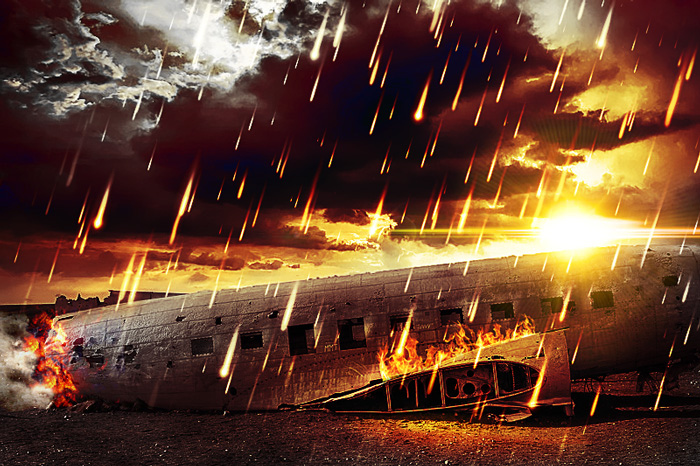
In this tutorial I will create an apocalypse Photoshop manipulation. Add fire effects in Photoshop to create an apocalyptic photo manipulation. To create this end of the world effect I used fiery color gradients, fire and smoke effects, fire rain and other light effects.
Here you can you can download more fire texture images and fire PNG images.
For this tutorial you will need these stock images, textures and other resources.
Add your photo in a new layer. For this tutorial I used this image of a airplane crash ruin but you can use a building, a car, etc.
Add a Brightness/Contrast adjustment layer.
Add this Fire Rain Texture overlay.
Set the blend mode to Screen .
Press Control-T to transform the image. Rotate the fire rain texture like shown in the preview.
Add a layer mask to the Fire Rain layer. Use the Brush Tool , color black and different opacity levels to hide some of the rain drops.
Add a Levels adjustment just for the Fire Rain layer.
To add dramatic colors to a photo in Photoshop you an use a Gradient Map adjustment layer. In this tutorial I want to create an apocalyptic photo effect. So add a Gradient Map adjustment layer and set the blend mode to Hard Light , opacity 83%.
The color tones for the gradient are: #000000 (location 0%), #7c0900 (location 50%), #ffbb38 (location 86%) and #ffffff (location 100%).
Duplicate the Airplane Ruin layer and move it above the Gradient Map adjustment layer. Set the blend mode to Saturation .
Add a layer mask to the Airplane Ruin Copy layer. Use the Brush Tool , color black and different opacity levels to hide some photo areas like shown in the preview.
If you keep the Alt key pressed and click on the layer mask thumbnail, the painted mask should look something like this.
Add this Fire and Smoke Texture in a new layer. Resize it and place it like shown in the preview.
Set the blend mode to Screen . Add a Levels adjustment just for this layer. Right click and choose Create Clipping Mask .
Pick the Burn Tool and use a soft round brush to darken the Highlights of the Fire and Smoke layer, to create a realistic result.
Add this Fire Seamless Texture in a new layer. Resize and rotate the texture. Place it on the airplane wing.
Set the blend mode of the Fire Texture to Screen .
Use the Eraser Tool to adjust the edges. You can duplicate this layer, scale it down to add more flames.
To create an explosion light effect I added this Lens Flare Overlay texture. Set the blend mode to Screen .
For the final touches add a new blank layer above the Airplane Ruin layer. Set the blend mode to Overlay and 75% opacity level. Use the Brush Tool and a soft round brush to add some highlights using tones of light yellow and white.
Add a new blank layer above all the other layers. Press Shift-Control-Alt-E to make a copy of the layers merged. Go to Filter > Other > High Pass .
To obtain a sharpen image effect, set the blend mode to Overlay with the opacity that you like.
Use the Burn Tool with a soft round brush and different opacity levels, inside the High Pass layer, to darken some areas. Use the Dodge Tool if you want to add highlights.
So here is the final result for this apocalypse photo effect . Adding fire effects in Photoshop and using dramatic color gradient maps, we created this apocalyptic photo manipulation.
For faster results you can try one of these Photoshop actions .
How to Make Animated Moving Clouds in Photoshop
Make a Pool Water Texture in Photoshop