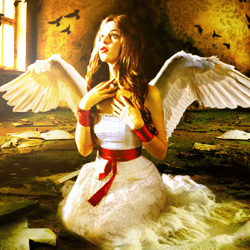
Learn how to make a beautiful fallen angel Photoshop manipulation.
I saw this beautiful stock image with the girl and decided immediately that she is perfect for an angel so this is how my image came to life. It is an easy to create photo manipulation and you can play with settings, colors, shadow and light! I hope you enjoy reading this tut! Let's start!
Open a new photoshop file size 600/600 pixels. Now open this beautiful photo of an old room
Place the image on the right side of the screen. Duplicate this image and Flip Horizontally , than place it on the left side as shown in the image.
I have also deleted some parts from the left side image (the red area).
Another thing that I have to do is to fill the empty area from the bottom of the image. Use the Clone Stamp Tool . Keep the ALT key pressed and click to select the starting point. Make the floor look realistic.
Add the Girl. Copy this beautiful stock image Snow4 into your file. Remove the background and resize the image to 72%.
Go to Image > Adjustments > Brightness/Contrast and change the balance to obtain a similar look:
In this step I want to add a dramatic look to the angel. For that I will add sea foam on the bottom of the dress.
Scale this image to 80% than flip it horizontally and place it like in the image :
Change the blending mode of this foam layer to Hard Light 100% . Use the Dodge Tool to blend better the foam with the dress.
Create a new layer similar to the Foam Layer above but this time scale it to 50% . The blending mode is also Hard Light 100%.
In this step I will add wings to the fallen angel using Photoshop. Copy this Swan wings in a new layer. Here you can find more wings PNG images with transparent background.
Remove the background. Select the left side wing and resize it as shown in the image:
Place this Marble Cross on the floor.
Change the Color Balance .
Adjust also the Brightness/Contrast balance by increasing the contrast and lowering the brightness.
With the Eraser Tool erase part of the cross to blend with the rest of the image.
Use also the Burn Tool to add shadow on the cross and give the illusion that it is under the rock. Use also the Dodge Tool to add light accents.
Add this birds silhouette PNG image.
Add this old paper texture in a new layer and set the blend mode to Overlay 100%.
To make the image look more interesting you can try to darken the right side of the image. Create a new layer and use the Burn Tool to darken the image. You can also use the Blur Tool to add a blurry effect to the background.
To create rays of light add this Rays of Light Texture Overlay and set the blend mode to Screen . You can add more layers and use the Gaussian Blur filter to obtain a softer light. To sharpen the rays of light you can use a Levels adjustment just for the Rays Of Light layer.
Color and light matching is very important in photo manipulations. So lets add a Gradient Map adjustment layer with Color blend mode and 85% opacity level. The colors for the gradient are: #000000 (location 0%), #ef9b2e (location 35%) and #ffffff (location 100%).
Take the Brush Tool and paint inside the Gradient Map layer mask using different opacity levels and color black. Paint over the girl to reveal the original colors.
For the final touches you can use the High Pass Filter fpr the merged image using Overlay blend mode. The High Pass Filter technique is used to sharpen images in Photoshop .
For the finishing touches we will add a beautiful light to our final result. It will look like the angel has a halo around her.
Use this rays of light texture from Textures4Photoshop. Add the rays texture as new layer on top of the fallen angel image. Switch the blending mode to Screen , then simply rotate it and place it somewhere in the top right corner of the image.
The Mad Horror Clown
The Night of the Halloween Killer Pumpkin