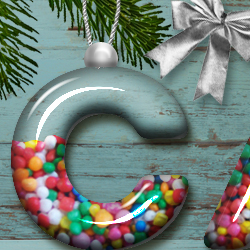
The winter time of year is at our doorsteps and the holidays are coming in just a few weeks. So today we'll create a candy glass text effect perfect for creating Christmas typography . You can be creative and fill the glass letters with other sweets like chocolate candies for example.
First you have to download this ZIP file that contains the textures, styles used for this tutorial. You have to load the ASL and PAT files in Photoshop.
Create a new PSD file and use a wood texture as background.
Now you can add your text. Use the Intro Font which is a free font type. Call this layer Text Layer .
You can also check out this awesome list with over 25 free Cake Fonts that you can download and use for commercial projects. Use the cake fonts online with the MocoFun text editor or install the fonts on your computer and use them in Photoshop.
Now I want to transorm the font type a little to create rounded corners. You can pick from the beginning a font type that has rounded corners. So, first right click on the Text Layer and choose Rasterize Type .
Keep the CTRL key pressed and click on the Text Layer thumbnail to make a selection.
Go to Select > Refine Edge and make de following settings.
Press SHIFT+F5 to fill the selection with any color you want. Press CTRL+I to Inverse Selection and press DELETE. Finally press CTRL+D to Deselect.
Right click on the text layer and Convert to smart object . Call this layer Candy Glass Text 1 . Make 3 more copies: Candy Glass Text 2 , Candy Glass Text 3 and Candy Glass Text 4 .
Now we have to add layer styles for all the 4 layers to create the glass text effect . Let's start with Candy Glass Text 1 ; double click on the layer to open the Layer style window .
Now go to the next layer, Candy Glass Text 2 and add these layer styles:
Now go to the next layer, Candy Glass Text 3 and add these layer styles:
Now go to the final layer, Candy Glass Text 4 and add these layer styles:
Your transparent lass text effect should look like this.
Go to Candy Glass Text 1 and press SHIFT+CTRL+N to create a new layer. Call it Candy Texture . Fill this layer with any color you want and add a Pattern Overlay using this candy seamless texture .
Go to Candy Glass Text 1 , keep the CTRL key pressed and click on the layer thumbnail to make a selection. Return to the Candy Texture layer and click the Add layer mask button.
Click on the layer mask of the Candy Texture layer. Use the Brush Tool with a hard round brush and color black to hide parts of the candy texture like shown in the image. Make sure on the top edge to have rounded candies not cut parts.
Add an Inner Shadow layer style to the Candy Texture layer.
You can use this Chrstmas tree border to frame the image. This is a PNG frame so you have to download and place in your PSD file. Don't forget to add a Drop Shadow effect.
You can also add some Christmas tree fir branches. In order to use it you have to remove the white background. So here is a video tutorial on how you can remove background in Photoshop using alpha channels and layer masks .
Add a Color Balance adjustment just for this layer using the clip to layer option.
Add a Brightness/Contrast adjustment just for the Fir Branch Layer using the clip to layer option.
You can now rasterize the Fir Branch layer and the two adjustments(select the 3 layers and press CTRl+E to merge the layers). Call the resulted layer, Fir Branch . Now dupplicate the layer several times and rotate, resize, move the layers to create a fir tree frame.
If you want you can turn these candy glass letters into Christmas tree ornaments . Use the Pen Tool to create these shapes. Add layer styles to create a silver glossy effect. You can find the layer style called "silver style" inside the ASL file that you downloaded at the beginning of this tutorial.
Use the Brush Tool and a hard round brush to draw some lines. Add layer styles to create a silver thread effect. You can find the layer style called "silver thread style" inside the ASL file that you downloaded at the beginning of this tutorial.
To make the Christmas balls look even more festive you can add a bow on each object or even on the Christmas tree branches . As you can see the orginal image is a golden bow and we want a silver bow to match with the other color tines. So add a Hue/Saturation and a Curve ajustments just for the Bow Layer .
You can also use these Christmas PNG ornaments:
If you want to add falling snow effect you can add the falling snow texture and set the blend mode to Screen . You can use these textures snowfall 1 and snowfall 2 with Screen blend mode. Also you can download this snow brushes and add snow using the Brush Tool and color #ffffff.
Here are some more snowfall textures that you can use with Screen blend mode.
If you want you can add more winter effects using this Icicle PNG image.
So here is the final result for the Christmass glass balls text effect filled with colorful candies . For the background I used a vintage wood texture and a festive fir tree frame. Hope you give it a try!
If you don't have Photoshop, you ca make designs online.
Did you know you can use online tools like MockoFun to make Christmas cards? Combine Christmas vector shapes with text and create some amazing Christmas cards. MockoFun provides pre-made templates for making Christmas cards online in just a few minutes.
Check out this awesome list of over 50 Christmas fonts that you can use online or download for free to use in Photoshop. Combine Christmas fonts with text symbols like a star symbol for example.
Check out this tutorial on how to use the online Christmas Card Maker and all the awesome features that MockoFun has to offer.
Create a Pizza Food Text Effect in Photoshop
Winter is Coming Photoshop Manipulation Tutorial