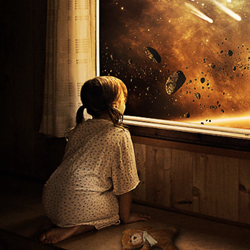
Childhood's End is a 1953 science fiction novel by the British author Arthur C. Clarke. The story follows the peaceful alien invasion of Earth by the mysterious Overlords.
This sci fi photo manipulation is inspired by the apocalyptic moment when life as we know it will come to an end, followed by the disintegration of planet Earth.
If you need more fire texture images and fire PNG images for your projects you can download them for free. And if you want to create a fire explosion you can try these free explosion Photoshop brushes .
Open room image and use the Brush Tool or Pen Tool to select the window area and cut. If you use the Brush tool , create a layer mask and use foreground color black.
Now open the Cosmos 8 stock image and put the planet image below the Room Background Layer .
Open space hole stock image and place it on the planet with blend mode Screen . Create a layer mask and delete unnecessary parts using the brush tool (foreground black) as shown in the picture below.
Also open the wormhole stock image and put in the left corner of the window. Blend mode also set to Screen with opacity 100%. Create layer mask and use brush tool to delete unnecessary area.
Place the Cosmos 1 stock image and set the Blend mode to Luminosity as shown in the picture below.
As an alternative you can use this Galaxy Premade Background for this photo manipulation of for other projects.
If you want you can add a lens flare on the wormhole with blend mode Screen with opacity 35% .
You can use different types of optical flare effects if you want to obtain a different result.
Now place the Asteroids stock image and reduce the size by pressing CTRL+T. Make six copies and add motion blur to the last copy. Go to Filter > Blur Motion Blur , Angle set to 25, distance to 10px.
Now add the cracks in the glass; open broken glass and put them on the window. Reduce size by pressing CTRL+T. Set the blend mode set to Screen and make several copies. Now create layer mask and delete with brush tool unnecessary parts with foreground color black.
Place the asteroid in the crack of the glass as shown in the illustration. Create a layer mask and use the brush tool to wipe the rest so that there is only one asteroid. And add the effect of motion blur like you did in a previous step.
Open the Teddy bear stock image and use the Quick Selection Tool to make a rough selection. Press CTRL+SHIFT+I to invert the selection. Now press Quick Mask Mode and use the brush tool to select precisely the rest. Again press Quick Mask Mode (standard mode) and CTRL+C to copy. Another method to create a precise selection in Photoshop is by using the Pen Tool which is probably the best method to cutout an object/person by removing the background.
Right click on Teddy Bear layer and go to the Layer Style window . Check Drop Shadow and set the opacity to 100% (Multiply), Distance 5px, Spread 0px and size 13px. You have to adjust these settings to match with your image size. Beside the Drop Shadow style you have to add an Inner Shadow , Inner Glow and Gradient Overlay .
Creat a new layer and use these Comet brushes to add to your image. Make several copies with different sizes for the comets. For color use white.
As an alternative, you can use this meteor shower texture in a new layer and set the blend mode to Screen . Press Control-T and set the Horizontal scale to -100% . Use the Eraser Tool to keep only some meteors.
Add a Gradient Map adjustment layer with Clipping Mask . For the gradient use the colors #000000 (location 7%), #8a8a8a (location 16%) and #ffffff (location 57%)
For the final touches we need to make some color adjustments.
Now create new Image > Adjustments > Curves and set Input to 153 and Output to 109. Create a layer mask and use the brush tool to delete the center of the image.
Go to Image > Adjustments > Brightness/Contrast and set Brightness to -26 and Contrast to 7. Create a layer mask and repeat the process from the previous step.
Go to Image > Adjustments > Color Balance and set Midtones -10 -8 -4 , Highlights +6 -3 -2 , Shadow -2 +1 +8 and Opacity set to 50%
Go to Image > Adjustments > Photo Filter and set Filter to Sepia with Density 65% and with Opacity 40%
Press CTRL+SHIFT+ALT+E to merge all layers . Go to Filter > Render > Lighting Effects and set Intensity to 37% . Now create a layer mask and use brush tool to delete all around the window. Opacity is 45%.
For the final touches you can use the High Pass filter to sharpen the image . Adding a Gradient Map , blend mode Color and opacity around 30% , you can easily change the color tones of your image.
You can also try these awesome Photoshop actions.
Star Wars Movie Poster Photoshop Tutorial
Nature Rebirth in Spring Photoshop Tutorial