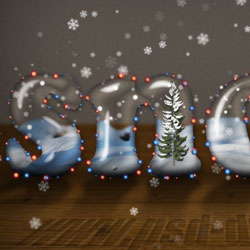
Because the Christmas is coming soon I decided to make some winter season inspired text effects and I will start today with this beautiful snow text effect . To create it I was inspired by this awesome Christmas snow globe tutorial . So starting from this Christmas snow style I start creating my snow and glass text effect using a simple winter landscape , transparent glass text and of course some really nice snow brushes .
For more tutorials like this you should check out this fantastic list of Christmas Photoshop tutorials .
Learn how to make a creative snowy glass text effect in Photoshop just in time for the upcoming Christmas time. For this tutorial you have to know how to add layer styles , how to work with paths and how to apply layer masks in Photoshop. Each step has a reference to tutorials for beginners so that everybody can complete this tutorial.
I will use a wood texture to create a wood table as background for my snow text effect but you can choose any background you want. I decided to keep it simple.
Pick the Type Tool and write a text using Cooper Std free font. You can choose any other font that you fond on the internet; I prefer a round font. Call this layer Transparent Glass Text .
Reduce the Fill of the Transparent Glass Text layer and add the following layer styles. We want to obtain a transparent text .
After appling all these layer styles our text should look like a transparent glass text . There are little details that you have to make in order to look like real glass. You can download the PSD file to see all the layer style details like colors and contour settings.
To make the text look like it is placed on the table, I have added a soft shadow effect. Create a black rectangle below the text bottom area and simply use Gaussian Blur and lower the opacity to make it look realistic.
Copy this snow stock image and use the Pen Tool to select and crop parts from the snow area. If you are not really sure how to do that check out these How to Use Pen Tool tutorials for beginners.
After right click and choose Make Selection , press SHIFT+CTRL+I to invert it. Press CTRL+J to make a Layer via Copy out of this selection. Call the new layer Snow Area .
Duplicate the Snow Area one or two times and arrange them to obtain nice snow dunes like in the image. Use the Burn Tool and Dodge Tool to create contrast areas. When you are sure about the result merge the Snow Area layers into one layer again.
Make a selection out of the Transparent Glass Text layer. To make a selection hold down CTRL and click on the layer thumbnail. Use this selection as a layer mask for the Snow Area layer.
Next I will add some of these Christmas trees and place them on the snow. You will have to resize them and place a couple of trees where you decide best.
Add a little shadow effect under each tree to look as realistic as possible.
In this step I will use some snow brushes to add snow effect . Use the Brush Tool and color white to add the snow in a new layer called Snow Layer .
Use Transparent Glass Text layer as a mask so that the snow to be just inside the text.
As a final touch I have added two Lights Layers . Simply make a Work Path out of the text layer and Stroke Path using the lights brushes . To create the lights I will use a simple dotted brush like in this tutorial with one small change; use the Shape Dynamics to set the Size Jitter to arround 60%. And also I have used the Scattering option to set the Scatter to around 260%. Inside the ZIP file that you can download at the end of this tut, you will find the layer styles that I have used for the lights. You can easily change the color if you want other combination.
Duplicate all the snow text layers and merge them. Use this merged layer to create a text reflection . Learn how to create a reflection in Photoshop . I have also added a sparkle effect ; learn how to create sparkle brush from this easy to follow tutorial.
If you want you can add the falling snow texture and set the blend mode to Screen . You can use these textures snowfall 1 and snowfall 2 with Screen blend mode. Also you can download this snow brushes and add snow using the Brush Tool and color #ffffff.
So here is the final result for the Christmas Snow Text Effect that you can use for the upcoming winter season. Great for creating personalized Christmas cards . Hope you upload your results at our comments section.
The PSD file for the snow globe text effect has all the layers and layer styles intact. This is only for personal non-commercial use; the redistribution on other websites is not allowed.
Did you know you can use online tools like MockoFun to make Christmas cards? Combine Christmas vector shapes with text and create some amazing Christmas cards. MockoFun provides pre-made templates for making Christmas cards online in just a few minutes.
Check out this awesome list of over 50 Christmas fonts that you can use online or download for free to use in Photoshop. Combine Christmas fonts with text symbols like a star symbol for example.
Check out this tutorial on how to use the online Christmas Card Maker and all the awesome features that MockoFun has to offer.
You can create unique Christmas effects using this one of a kind premium Photoshop action set. The pack contains 2 Photoshop actions that will allow you to create realistic Christmas snow globe effects out of any text, shape, raster or hand drawn path. It comes included with a fully detailed PSD Help File for you to obtain the best results.
3D Wood Photoshop Text Effect
Golden Tinsel Christmas Text Effect in Photoshop