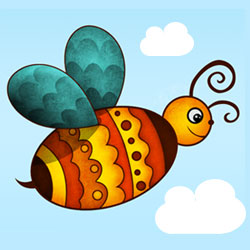
Learn how to create a creative cartoon character for the upcoming Easter time of year. We are going to make a Photoshop Easter Egg and turn it into a cute vector bee . This tutorial requires intermediate Photoshop skills, especially vector drawing. So it's important to know how to work with the Pen Tool and how to use Photoshop shapes .
I really hope you will enjoy this Photoshop tutorial and if you want to make other Egg Bees you can use one of my egg shapes to simplify the process a little bit. They are vector shapes so perfect for this tutorial.
This tutorial was written by Oana Livia Apostu , a very talented, self-taught Romanian artist . You can see some of her amazing drawings on her blog.
Before we begin let's take a quick look at the little creature we are about to create. This requires some basic Photoshop knowledge. More exactly, you will manipulate shape layers, mostly created using the Pen Tool . The fun part about this tutorial is that you can achieve different results, according to the colors you chose and the shapes you create.
Use the Ellipse Tool draw two ellipses, one for the head and one for the body. The color is #ffd800.
Press Control+' to show grid. Using a Photoshop Grid helps you draw better shapes.
Next, we need to add some effects to these shapes. Open the Layer Style window and add Inner Shadow , with the following parameters: color #db0000 (always choose a darker color than the base color, which is yellow in our case; but respect the type of colors: use a warm darker shade for a warm base color and a cold darker shade for a cold color); distance 0 (this will cast the shadow uniformly in all directions); choke 10 ; size 75 . Set the blend mode to Multiply . Also add a Stroke line, color #3d1100, size 5, position: inner, blend mode: normal, opacity: 100%.
Before adding details to our bee, here is a little trick I use quite often. Create a Group folder and add the body layer. Create a Layer Mask for this group (just like in this Photoshop masking tutorial ) and set it so only the body is visible. By adding details inside this group, you do not need to worry about staying inside the body shape. It is somehow similar to locking the transparent pixels when drawing inside a lineart.
Now we can start adding details on our egg-bee. Below are the colors I will be using. Again, you can use the same, or choose different ones. Free your imagination. All the details will be added using the Pen Tool and the Shape Layers option. Creating shape layers instead of filling pixels has the advantage of allowing all transformations without damaging the quality. It is like playing with vectors .
Start decorating your egg-bee with the shapes and colors you like. Your imagination is the only limit. Notice that although my shape is bigger than the bee's body, only the good part is visible. Just remember to add all your decorations in the same group folder.
Keep on adding shapes of different colors.
You will notice that although the added shapes are contained within the bee's body, they overlap its contour. In order to solve this, duplicate the body layer, place it on top of the folder group containing the shapes, and set its Fill to zero. By doing this, the shape becomes completely transparent, but all its Layer Effects (such as Stroke or Shadows ) remain visible.
Now it is time to add some effects to our shapes. For each shape, open the Layer Style panel and add Inner Shadow (in the example below I used #6a0000, Multiply at 75%, but you can use any color you want. Just remember to respect the warm-cold rule). Do not forget to set your Distance at zero, to ensure a uniformly distributed shadow. Also add Stroke , in order to better outline the shape's contour.
Repeat until you achieve the desired result.
Now it is time to add the small details: eye, nose, mouth, tail and antennae. The eye is made up from four circles: A white one, with a black stroke, a black one and two little white ones for the light reflections. The nose is another circle, and the mouth was drawn using the Pen Tool .
The antennae are also drawn using the Pen Tool , as shape layers. This is always the challenging part for me. I never get those pen lines perfect. They are weird and messy. Sometimes having a rough hand-drawn sketch helps a lot. Do not forget to add a tail !
The last thing that needs to be added are the wings. Using the Pen Tool , draw a shape just like the one below. I chose the color #4ac9c2. Open the Layer Style and apply Inner Shadow and Stroke .
The wings look quite flat, so we are going to add some details. Again, create the shapes using the Pen Tool . They have the same color as the wing. Open the Layer Style and apply Inner Shadow , as shown below. Do this for every shape. In the end, duplicate the wing and place the copy on top of all the detail layers, using zero Fill.
Now duplicate your wing and rotate it until you find a good position. Place the copy wing behind the Bee, by arranging the layers' order.
Now we have a cute Egg-Bee ! However, since I am a texture freak, I always add a texture to my drawings. Here I have used an old-time favorite texture that I created myself from bits of pictures. You can find it in the PSD available for download for the registered users.
Or you can create your own, or find one you like on the available stock websites. I placed my texture using the Overlay mode, with an opacity of about 65%. You should also add a mask which restrains the texture to the Egg-Bee. That way, if you use it on a color background or in a composition, the texture will not affect the surroundings of the bee.
Play around with your result. Here are two Egg-Bees in a cloudy sky. I have used these cloud shapes that are also vector shapes . This is the final step of this tutorial that I hope you have enjoyed reading.
If you want to see exactly how the Egg-Bee Character was created, you can download the PSD(1.20MB) for free if you are one of our registered users.
The file contains all the vector shapes used and the intact layer styles . The PSD is only for learning purposes, so it can not be redistributed or sold without the author written agreement.
Install Font in Photoshop
Photoshop Rose Text Effect Tutorial