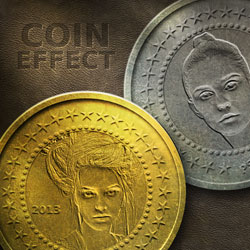
Learn how to create a metal coin in Photoshop using some basic layer styles . For the coin center image I will use the emboss filter that will add a 3D effect . You will also get the free coin PSD mockup file to create your own coins with minimum effort with the use of smart objects . Simply add your image inside the smart object and save.
Military commanders offer pocket-sized medallions known as challenge coins to service personnel as a form of camaraderie. A commander's one-of-a-kind coin, usually made of copper, bronze, or nickel, bears insignia and mottos representing the unit or office.
Start by creating a background; you can use any texture you want for the background, I decide to use a dark brown leather texture that you can find here.
Use the Ellipse Tool and keep the SHIFT key pressed while drawing to create a circle shape . Color for the shape is #6d6d6d
Duplicate the Circle Layer and use the Path Selection Tool to select the shape. Press CTRL+C to copy and CTRL+V to paste the shape into the same layer (Circle 2 Layer). Use the transform Tool to scale the circle to around 95%
Use the Path Selection Tool to select the second circle shape inside the Circle 2 Layer and press Subtract from shape area .
Let's add some decorations that every must have; for that purpose I will use my Circle Photoshop Shapes . Inside the CSH file you will find star circles , dotts circles and so on. Plentry to choose from. So add the decorations that you like.
Now we have to add some layer styles to the Circle 2 Layer and to the Start Dots Circle Shapes . Set the Fill of both layers to 0%. You can use some of these amazing Letterpress and Emboss Photoshop Styles with small adjustments.
After small adjustments especially for the Circle 2 Layer your result should look similar to this one. You can download the PSD file to get the exact layer styles and other settings.
I will use this girl portrait (the original image is no longer available) to create a bas-relief effect in the center of the image. I will explain in just a few quick steps the process. Inside the PSD file you will find a smart object that you can use to add your own image.
So open the image and desaturate it to obtain a black and white effect ; cut the image into a circle shape like shown in the preview.
Go to Filter > Stylize and choose Emboss using these settings.
Set the Blend mode of this layer to Overlay ; you can duplicate the girl layer and set the opacity to around 50% or less to obtain a bigger contrast.
You can add further details like some text, year, etc. Add also emboss layer style to all the added items.
The only thing left to do is to texturize the coin using a metal texture or gold texture. I will use this grunge metal texture with a Overlay blend mode. Browse through our metal texture collection if you want to choose a different one. You can desaturate a little the texture or change the color tones using Hue/Saturation adjustment.
Here are some other textures that you can use with Overlay blend mode, opacity 50% or less:
Add Drop Shadow effect, add some light and shadow effects and this is it, you have a pretty nice coin effect made in Photoshop using some simple techniques.
Here are some examples of what you can create using this coin photoshop tutorial ; if you want to obtain more professional and realistic coins you can try this amazing Photoshop Coin Generator that you can purchase from graphicriver .
Here you have some premium Photoshop actions that you can use for creating great looking metal effects with just 1-click. Easy to use and customize.
Create a Water Reflection Effect in Photoshop
Create a Zebra Fur Texture in Photoshop from Scratch