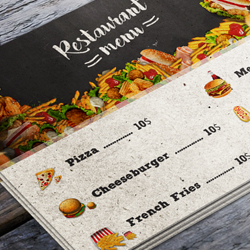
Learn how to create a restaurant menu card template in Photoshop using textures, food icons and text. You can create professional card layout and template designs for your business using this tutorial. The hero header image is made by textures4photoshop website where you can find other cool header backgrounds that you can use for commercial use.
Making a restaurant menu page in Photoshop is a lot of fun and you will learn a lot of techniques. But, if you're looking to make a menu for a restaurant there's a quick and easy way: use the MockoFUN online graphic design tool .
MockoFUN is so easy to use and there are lots of pre-made templates that you can easily customize. Here's an italian menu template that you can quickly load and change in MockoFUN. Then, you can print it in high-quality A4 format at 300dpi:
Create a new PSD file, canvas size 800x570px ; you can choose any size you want but for the same result you have to keep the proportions. Create a new layer called Background and fill it with color white.
In a new layer add this free for commercial use Fast Food Restaurant Background stock image and place it as header for your flyer.
Add an Inner Shadow layer style to the Fast Food Background layer.
Press Control+' to show the grid. The Photoshop Grid helps you align the elements of a layout design.
Use the Type Tool to write a text like "Restaurant Menu" for example. For this restaurant flyer I will use the Bakery Font type. Learn how to install new font in Photoshop from this quick tutorial for beginners. I used two text layers, one for "restaurant" and one for "menu".
Use white color for the text to look like chalk. If you want to learn how to create realistic chalk effect in Photoshop , here you have a list of tutorials, styles and actions to help you do it.
Press Control-T to transform the text layers like shown in the image.
Use the Pen Tool to create some wavy lines.
Depending on what type of food you have in your menu, choose food icons from this collection.
For each food icon add a text layer with the name and price. I will use Sketch Block Font but you can use ant font type you like. For the font color use a dark tone of gray #302e2f .
To create the effect that the flyer is printed on a rough paper, I will use this paper texture and add it in a new layer above all the other layers. Set the blend mode of the Paper Texture layer to Multiply .
Add a Levels Adjustment to lighten the paper texture.
Add a Hue/Saturation Adjustment to desaturate the paper texture.
So here is the final result for the restaurant menu flyer designed in Photoshop .
Inside the PSD file you also have the wood table with the stack cards mockup. All you have to do is to add the wood texture inside the smart object, save and see the result. Also you can change the design of the menu card inside the smart object and the mockup will update.
If you have enjoyed this tutorial on How To Make A Restaurant Menu Flyer In Photoshop make sure to also look for inspiration in this amazing list of 100 Photoshop Food Text Effects And Typography .
And if you want to create amazing party flyers quickly, you should take a look at this professional grade Photoshop actions by PSDDude:
Paint Drip Text Effect in Photoshop
Create a Metal Coin in Photoshop