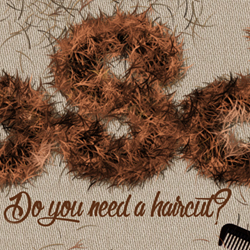
In this tutorial you will learn how to create realistic hair and fur in Photoshop using some simple yet effective techniques. This can be used as animal hair or as human hair so it is a versatile effect. With the right color tones it can even be used as grass.
In this tutorial you will learn how to create a hair or fur text in Photoshop using fur brushes and textures . It will take about 10 minutes to make this realistic hair typography so let's take a quick look at what will be creating.
In this first step we'll create the background. A bad looking background can ruin the text effect so you have to choose carefully. For this text I decided to add a light color fabric texture as background. But you can choose for example a rustic wooden texture from this list of free wood texture . Another great choice is to use a crumpled folded texture so be creative.
To create the background we need a linen fabric pattern that you can find inside the PAT file. So download the files needed for this tutorial . You have to install the ABR and PAT files in Photoshop . Go to Edit>Preset Manager and choose the Preset Type . First choose Brushes to load the ABR file and after that choose Patterns to load the PAT file.
Create a new PSD file of 1200x630px. Create a new layer and call it Linen Background . Fill the layer with any color you want and add Gradient Overlay and Pattern Overlay layer styles.For the Pattern Overlay choose the seamless fabric texture pattern.
To make the linen fabric more realistic you can use a grounge background ; add the texture in a new layer and change the blend mode to Soft Light or Multiply with opacity around 30%. It all depends on the grunge image that you use. It has to be a neutral color tone like light gray or cream. So your linen fabric background should now look like this.
Add the text in a new layer. Call this layer Hair Text . You can use any font type you want. I use the Pooplatter font type which is 100% free.
Add a Pattern Overlay layer style to the Hair Text layer. Use the pattern "hair-2-by-psddude" from the PAT file that you installed in a previous step.
Create a new layer just above the Hair Text layer and call it Hair Border . Keep the CTRL key pressed and click on the Hair Text layer thumbnail to make a selection .
Right click on the selection and choose Make Work Path .
Set the Foreground color to #975126 and the Background color to #2a1412 . Select the Brush Tool and pick the "hair brush 1 by psddude", size 60px, mode Normal and Opacity 100% .
Pick the Path Selection Tool and right click on the work path and choose Stroke Path .
Press delete to delete the work path.
Add a Drop Shadow Photoshop layer style.
Select the Hair Text layer and the Hair Border layer and merge the two layers. Call this new layer Hair Fur Text and add Drop Shadow and Inner Shadow layer styles.
Make a new layer and use the "hair brush 3 by psddude" to add some details like shown in the preview.
For the final touches you can add a scissors for example and a comb to make the image more interesting. Use the Pen Tool to make a precise selection and to remove the background. Also add a Drop Shadow and an Inner Shadow layer styles to the Scissors and Comb layers.
So here is the final result for the fur or hair text effect made in Photoshop using brushes, textures and layer styles. Easy and fun to make, so I hope you enjoyed reading this tutorial!
How To Make A Custom Gradient In Photoshop And Elements
Cream and Chocolate Cake Photoshop Text Effect