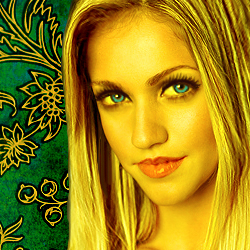
Hello, Today I will show you how to transform a photo of a woman into a glamorous photo manipulation. I will change: the skin tone into a shiny, golden tone; the eyes and lips color. I will add a new background and the result is a new improved image.
Wait until you see the final result! So I found this photo with a beautiful woman on Flickr .
Duplicate the initial layer and call this new layer Golden Image. As you can see the photo has a cold tone and I want to change that. I want to make it more yellow, to look like gold. Go to Image - Adjustments - Color Balance and do the following settings for midtones, shadows and highlights.
With three simple steps improve facial features. Go to Filter - Liquify and pick Bloat Tool.
You have below the tool options:
Place the tool in the center of the eye and click until you obtain this result.
Don't exaggerate because you will obtain a doll like look.
Don't exaggerate with the lips because you will obtain a trashy look and we want glamor not trashy.
For the lips use Forward Warp Tool to make the lower lip smaller. You need to zoom in the image to work better. Use brush size 50 and the setting presented below:
For the upper lip change the size of the brush to 13 and gently pull the lip up. For making the lip bigger you can pull down the upper lip.
For the hair use the same Forward Warp Tool but this time the size is 60. Change the aspect of the hair by modifying the volume of the hair. With red are marked the places were the brush was used.
Now I will remove the background by selecting the girl.
I always use Pen Tool for this kind of job. So take the Pen Tool and draw the shape of the girl; chage the opacity of vector layer to 0 % as you draw to see exactly the shape.
Hold pressed CTRL and click the Vector Layer Thumbnail.
Now select Magic Wand Tool and go to Golden Image; right click on the selection and choose Select Inverse; press delete. Now you will have only the girl with no background.
We will have to adjust the colors manually with burn tool, dodge tool and sponge tool.
Lets start with the skin tone. With the help of Sponge Tool saturate the skin.
Take the Burn Tool and darken parts of the skin like in the picture below.
Take the Dodge Tool and lighten parts of the skin like in the picture below.
For the hair use Burn Tool(midtones) and Dodge Tool(highlights) to give it contrast. Use the Smudge Tool (brush size 4 and strength 80%) to hide the left earring.
Duplicate the layer and go to Filter - Sharpen - Smart Sharpen
Now the problem is that we have the skin sharpen and that is not so good; so make a new layer on top of that one and with Brush Tool, size 50 , opacity 100% try to draw all parts of the skin. Set the opacity of this layer to 60% to see exactly what you need to draw. With the Eraser Tool opacity 100% delete the eyes, mouth and eyebrows.
Press CTRL and click the thumbnail of the Sharpened layer and press delete.
Simply draw a circle with Ellipse Tool, color # 88eef4. Zoom in the photo for a better precision.
Duplicate this circle and place it in front of the other eye.
Select the 2 circle layers and right click - merge layers. Call this layer Eyes layer.
Go to Blending Options of this new layer and do the settings:
Set the Blending Mode of this layer to Hue 100%
Now with the image zoomed in delete with the eraser tool the area that exceeds the eyes.
Create a new layer and with Brush Tool, opacity 100 % and color # ffd800 draw the mouth. Zoom in to draw the exact area.
Go to Blending Mode of this layer and set from Normal to Linear Burn 100%.
Create a new layer, call it Eyelashes. Download this eyelashes .
With Brush Tool, opacity 100%, size 46 draw the eyelashes. You will have to click twice or three times depending on how dark you want your eyelashes to be. Rotate the eyelashes, delete the unnecessary parts and place them in the right area.
Select all five layers Sharpened image, Unsharpened image, Mouth layer , Eyes layer, Eyelashes layer and right click - merge layers.
Draw a black rectangle and place it behind the girl layer.
I found this beautiful texture so copy it into a new layer above the black square layer.
Change the Blending Mode of this layer to Hard Light 100%.
As you can see the girl looks cut; we can fix that by adding a shadow.
Duplicate the Girl layer, go to Image - Adjustments - Brightness/Contrast
Call this layer Shadow and place it behind Girl layer. Move this layer to right and down.
Go to Filter - Blur - Gaussian Blur ; we do that to blur the edges of the shadow. Change the blending Mode from Normal ti Hard Light 100%. In the initial photo we have the shadow. Because i didn't change the light direction I will try make the shadow similar to the initial shadow.
Another thing we can do is burning with Burn Tool the edges of the Girl layer.
There are parts where burning tool is useless; for example the hair from the bottom left; for that I will use Smudge Tool
Than with the Sharpen Tool, sharpen the part of the hair from above:
The final result! Hope you've enjoyed this tutorial!
Halloween Graffiti Text Effect