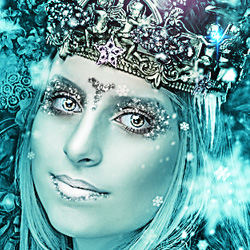
In this Photoshop tutorial you will learn how to create a realistic ice effect in Photoshop. I will show you how to create a beautiful frozen queen portrait effect in Photoshop using some useful techniques like color adjustments. To create a beautiful snow scene in Photoshop you need snow overlay textures and also you have to change the color of the image to a blue cyan tone.
For this tutorial you will need these stock images, textures and other resources.
Open this Medieval Queen stock image in a new layer.
Add some Icicle on the crown to create the frozen effect. Set the blend mode to Screen . You can of course add icicles on other parts. This PNG image is seamless so you can use it to create icicle borders.
Add this Snowflakes Texture Overlay in a new layer and set the blend mode to Screen . Use the Eraser Tool to delete some areas especially over the girl face. Use a soft round brush and different opacity levels.
To add more falling snow effect, use this Ice Snowflakes Overlay texture. Again set the blend mode to Screen . Use the Eraser Tool to delete some areas especially over the girl face. Use a soft round brush and different opacity levels.
Go to Filter > Blur > Gaussian Blur and add a soft blur effect. You can also use the Motion Blur effect.
To create the frozen effect I will use a Gradient Map adjustment layer. Set the opacity to around 84%. For the gradient use these blue color tones: #000000(loaction 0%), #1aa5ae(location 23%), #99fff7(location 58%) and #ffffff(location 85%).
Use the Brush Tool and a soft round brush to paint inside the Mask of the Gradient Map adjustment layer. Use 10% opacity for the brush and color black. Paint over the girl face to reveal some of the original colors.
To create beautiful eyes that pop, I will use this Princess Eye Texture and add it in a new layer. Resize the image and place it over the girl's eyes. Use the Eraser Tool to keep only the iris. Set the blend mode to Color Dodge .
Press Shift-Control-Alt-E to make a copy of all the layers merged. Call this layer Sharpen Effect . Go to Filter > Other > High Pass and set the Radius 2 pixels. If you have a larger size image you can set a bigger size radius.
Set the blend mode of the Sharpen Effect layer to Soft Light .
Use the Burn Tool inside the Sharpen Effect layer to add some shading effect. You can use the Dodge Tool for adding highlights. It is similar to contouring makeup technique .
You can add two more Sharpen Effect layers. Add one layer with Radius 2 pixels and Soft Light blend mode. Add another layer with Radius 4 pixels and Overlay blend mode.
Create a new layer and use the Brush Tool to paint over the lips, cheeks, nose and forehead to add highlights and a frosty look. Use the color white, a soft round brush and opacity 50%. Set the blend mode of this layer to Overlay .
To add a glitter makeup, add this Silver Glitter PNG image in a new layer and set the blend mode to Hard Light . Make sure you have glitter over the eyes, lips.
Add a Layer Mask to the Glitter layer and fill the mask with black. The gillter will obviously disappear.
Pick the Brush Tool and choose a Hard Round brush. Open the Brush Panel and make these settings to create a new customized brush.
Create a new Photoshop ice brush called Glitter .
Use the Glitter Brush to paint inside the Mask of the Glitter layer. Use color white for the Brush Tool and 100% opacity.
Add a Levels adjustment layer only for the Glitter layer using a Clipping Mask
If you want you can also add sparkle effects using this texture overlay with Screen blend mode.
To create a more intense frozen effect add another Gradient Map adjustment layer. Use these color tones: #000000(loaction 0%), #1cb5cc(location 23%), #99fff7(location 64%) and #ffffff(location 100%).
Use the Brush Tool color black and opacity 50% to paint inside the Mask of the Gradient Map adjustment layer. Brush over the Ice Queen face to add more contrast.
For the final touches I added a Lens Flare with Screen blend mode. Add also a Gradient Map adjustment layer only for the Lens Flare layer to change the color from blue to purple. Use these color tones: #000000(loaction 0%), #946398(location 68%) and #ffffff(location 100%).
Here is the final result for the Frozen Ice Queen Photoshop tutorial . You learnt how to create a frozen portrait effect in Photoshop in just a few steps using gradient maps for winter color effects.
I think this Photoshop ice effect tutorial will help you learn how to create amazing Christmas cards for the winter holiday. Also, check out this list for more beautiful Christmas Photoshop tutorials
Did you know you can use online tools like MockoFun to make Christmas cards? Combine Christmas vector shapes with text and create some amazing Christmas cards. MockoFun provides pre-made templates for making Christmas cards online in just a few minutes.
Check out this awesome list of over 50 Christmas fonts that you can use online or download for free to use in Photoshop. Combine Christmas fonts with text symbols like a star symbol for example.
Check out this tutorial on how to use the online Christmas Card Maker and all the awesome features that MockoFun has to offer.
If you enjoyed this tutorial, you must not miss these Premium Photoshop Actions for quickly creating frozen winter scenes effects from any image:
How to Make a Winter Holiday Card in Photoshop
Sparkler Light Text Effect Photoshop Tutorial