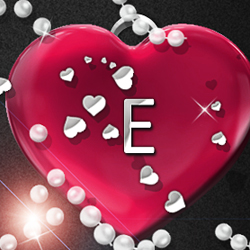
In this tutorial we'll create a beautiful glossy red heart text effect for the Valentine's Day . You can use of course any heart shape, icon, stock image, etc. I decided to use a glamour glossy heart because it goes perfectly with the pearl brushes . The result is a beautiful love heart pendant that I hope you like. If you want you can add use a chain brush to create a necklace, just use your imagination and you'll obtain beautiful results!
Let's start we a simple black noisy background . I will use this noise seamless pattern for my background layer. You can also add an Inner Glow layer style to create a nice vignette effect . My canvas is 1200x800 px, so all the layer styles used in this tutorial must be scaled to match with the sized you use. Learn about Scale Effects for Layer Style in Photoshop.
Copy this red heart JPG image into your PSD file. Use one of the Photoshop Selection Tools and remove the white background of the heart image. Also add a Inner Shadow style with these settings:
Now let's add two adjustment layers just for the Red Heart Layer . We'll use a Hue/Saturation to change the color, and a Brightness/Contrast to increase the contrast and make the heart more glossy.
Duplicate the Heart Layers 3 times and distribute the layers at equal distance like shown in the image.
On each heart add a letter spelling the word "love". I used the font type Calibri which comes included with CS5 but you can use any font you like. Learn how to install font in Photoshop from this quick tutorial for beginners.
To make the text effect more interesting I will use two different layer styles to alternate letters. For the "L" and "V" letters I will use this style:
Your text letters should look like this, with the letterpress Photoshop style applied.
For the two remaining letters use this glossy layer style.
After applying these layer styles your valentine text effect should look like this:
In a new layer I will use a heart trail brush and paint over the text effect like shown in the preview. Make the brush using one of these heart shapes ; to create the brush, add the heart shape in a new PSD file. Use the color black for the shape, opacity 100%. Go to Edit menu and choose Define Brush Preset . Pick the heart brush that you just made and use this tutorial to create the heart trail brush using the Photoshop brush settings like Shape Dynamics and Scattering .
Add a layer style to the Heart Brushes Layer ; I will use the glossy layer style used in previous step. Adjust only the Drop Shadow effect(distance 9px and size 0px).
Use the Pen Tool to create this shape to make the heart look like a pendant. Make 4 shapes like this and use a simple metal style for them.
Create a new layer, pick the Brush Tool and use these pearl brushes ; I will use the first set of brushes from this collection. Use color white for the brush.
Add these layer styles for the Pearl Layer to make them look more realistic.
You can also add some sparkle brushes for a little bling bling.
For the final touches I added some lens flare effects using the Filter > Render > Lens Flare . I used two types of lens flare, "50-300mm Zoom" and "Movie Prime". Learn how you can add multiple lens flare and with different sizes from this tutorial
So here is the final result for the glossy heart text effect made for Valentine's Day . Hope you like it and decide to give it a try!
Toybricks Lego Text Effect Photoshop Tutorial
Make a Love Declaration in Photoshop