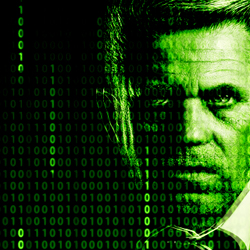
In this tutorial you will learn how to create a sci-fi portrait effect in Photoshop using a matrix GIF animation background . There is no need to create the matrix code rain animation , because we already have it. All we have to do is to apply the matrix texture overlay over our image and create a new GIF animation .
The Matrix is a science fiction movie created by the Wachowskis. A computer hacker learns from mysterious rebels about the true nature of his reality and his role in the war against its controllers. The series began with the feature film The Matrix (1999) , and continued with two sequels, The Matrix Reloaded and The Matrix Revolutions (both 2003) .
Other sci-fi movies that were popular in the late 70s and 80s were Star Wars and Star Trek . If you want to learn more about the 80s, read my article about 80s font and typography used in movie posters and video games.
For this tutorial you will nedd these stock images, textures and other resources.
First you have to download the Matrix Code Animation GIF Background that we are going to use in Photoshop to create the code rain effect.
Drag and drop the GIF file in your Photoshop to open it. You now have 19 layers in your PSD file.
Go to Window > Animation . Click on the right corner of the Timeline Window and choose Convert to Frame Animation .
Click on the first frame and set the Layer 1 blend mode to Screen .
Right click on the Layer 1 layer and choose Copy Layer Style .
Now select all the 19 frames. Click on the Frame 1 , keep the SHIFT key pressed and click on the Frame 19 to select all the frames. Do the same with the layers. Click on the Layer 1 , keep the SHIFT key pressed and click on the Layer 19 to select all the layers.
Right click on the layers and choose Paste Layer Style . Now all the layers should have the blend mode Screen ; if not you have to set it frame by frame and layer by layer.
Make sure you have all the frames selected and add the Man Portrait below the Layer 1 layer.
Make sure you have all the frames selected and add a Gradient Map above the Man Portrait and below the Layer 1 layer. The matrix green colors for the gradient are: #000000(location 16%), #3a7815(location 40%) and #fbffd9(location 100%).
Make sure you have all the frames selected and duplicate the Man Portrait and the Gradient Map layers. Place the new layers above the Layer 19 . Set the blend mode of the Man Portrait copy to Screen opacity 73%. Also move the layer to the left to obtain a glitch effect.
Make sure you have all the frames selected and right click on the Gradient Map copy and choose Create Clipping Mask .
Make sure you have all the frames selected and add a Curves adjustment over all the other layers.
If you want to create a more interesting glitch effect select random frames and change the opacity of the Man Portrait Copy from 73% to 100%. Also you can change the position with 1-2 pixels.
Before saving the animation we have to test it to see if it looks ok. So make sure the Select Looping Options is set to Forever and click .
To save the GIF animation, go to File > Save for Web and Devices and choose the GIF file format .
So here is the final result for the matrix face photo effect with rain code animation made in Photoshop using a matrix animated GIF background .
You can also try this new Photoshop action for creating animated glitch computer screen error effect out of any image. The glitch animated GIF can also be saved as static image.
The Mummy Movie Poster Photoshop Tutorial
Draw in Sand Effect Photoshop Tutorial