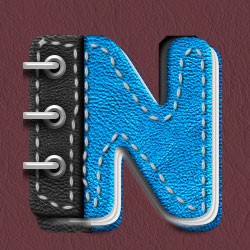
This is a back to school Photoshop tutorial that you can use to create truly unique text effects using your own name for example. I was inspired by a notebook icon that I found on deviantArt and decided to make a Photoshop text effect out of it. I really hope you will enjoy our new Photoshop tutorial and decide to practice it. Even if it looks like an advanced tutorial it can be also made by Photoshop beginners .
I will start by writing a text using capital letters. The font used is MyriadPro that comes with CS4.
Rasterize the text layer and using the Rectangular Marquee Tool add a rectangle shape to the N letter as shown in the image. Fill the selection with the same color.
Keep the CTRL key pressed and click on the layer thumbnail to make a selection. Expand the selection by 10px. Go to Select > Modify and choose Expand . Fill the selection with the same color.
Now I will create a rounded edge effect using this quick tutorial Rounded Corners in Photoshop
Now we have to duplicate this layer a couple of times. Make 5 copies and rename them Paper Layers and maybe group them. Add a notebook pattern and a Drop Shadow layer style. You can move each layer to look like notebook pages.
Now I will use one of the copies to create the notebook cover. For that I will split this layer in two layers; make a selection like in the image and press CTRL+X and CTRL+V to make a Layer via Cut . Call these layers Cover 1 and Cover 2.
OPen the layer style of one of the Cover Layers and add the following styles:
Now for each of the layers add Pattern Overlay using these leather patterns that I have used. You can of course use other leather textures with different colors.
Duplicate the Notebook Cover Layers and place them behinde all the other layers.
I will now add some stitched details on the notebook covers using some stitch brushes . Choose the size of the brush according to your text size. Make a selection out of the first cover layer and contract it by 7-10 px depending on your text thickness. Create work path using this selection and stroke path using one of the stitch brushes. I picked a very simple one.
Open the layer style window of the Stitch Layer and add Bevel and Emboss style.
So your text effect should now look like this with leather texture and stitch details.
Use the Ellipse Tool to create some metal details. Make a circle and duplicate it in the same layer. Resize to 50% and subtract shape from the initial circle. Duplicate the result two times in the same layer.
Add the following layer styles to make the circles look like shiny metal.
Now the paper leather stitched text should look similar to this image:
For the final touches you can add for example a vertical vector ribbon choosing one from this list. Or you can crete one yourself like I did. You can also add other paper details like colorful notes, scotch tape brushes or other stationery elements .
So here is the final result for the notebook paper text with stitched leather cover . I really hope you have enjoyed this new text effect tutorial and that you will decide to practice it.
If you want to skip all these steps and obtain a similar result you can use this 1-click Photoshop action - Leather Notebook Text Photoshop Creator for only 4$ .
If you are looking for newspaper letters , cut out letters or magazine letters, you can use these online text effects.
Eraser Photoshop Text Effect
Comics Text Photoshop Tutorial