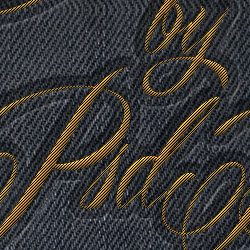
In this tutorial we'll create an embroidered logo using only layer styles and of course a fabric material. Stitching and sewing can be created also in Photoshop with very realistic results. I chose a denim fabric texture but you can of course choose any fabric you want. If you change the material automatically you will have to adjust also all the layer styles. Here are some other Photoshop stitch tutorials and brushes that you might also like.
How to make embroidery designs in Photoshop? You can use an embroidery Photoshop action, an embroidery mockup or, you can create the embroidery effect from scratch.
Learn how to create embroidery effects and sewing effect from this embroidery Photoshop tutorial. You can also use the embroidery Photoshop action for really fast results. You will obtain a realistic embroidery Photoshop effect instantly.
If need an embroidery effect generator, check out this Embroidery Photoshop action collection. The embroidery text generator has lots of cool features, stitching brushes and embroidery mockup included. Make your own embroidery Photoshop mockup using text, logos, etc. Find the best embroidery effect generator for a low price.
For the background you can choose any type of linen texture ; I will use one from my list of jeans textures . If you want to try to create this embroidery effect in Photoshop using other textures you can also check Textures4Photoshop for free to use jeans texture images or background textures from this list of embroidery texture images. Make sure you adjust the texture to obtain a dark denim background otherwise the embroided text will not look good. Another solution is to use an embroidery pattern Photoshop file (PAT file).
For creating the embroidery effect we need a font type that looks good on that kind of sewing effect. Handwritten signature fonts would work lovely. Here's a list of free signature fonts that you can download and install in Photoshop:
Free Signature Fonts by MockoFun
You can embroid any kind of image but for this tutorial I will use a text. So for the embroidery text I will pick this free calligraphy font type called Mardian . Download the font type and install font in Photoshop like shown in this tutorial.
Convert the Text Layer(s) into a smart object ; you may have more than one text layer so you have to select all of them and turn into a smart object. Call this new layer Embroidery 1 . Make two more copies of this layer and call them Embroidery 2 and Embroidery 3 .
For each smart object we will add different layer styles and other effects like smart filters. So let's start with the Embroidery 1 layer, Set the Fill to 0% and create a pressed effect using these styles:
The pressed jeans effect should now look like this:
I always like to experiment with textures. If you want to get a different embroidery effect, you should try this awesome embroidery texture that you can download for free from Textures4Photoshop. Use the embroidery texture in the next step instead of the pattern. For now we'll just stick with a simple pixel pattern
Go to the next layer, Embroidery 2 , and add a Pattern Overlay using a free pixel pattern from DeviantArt with oblique stripe lines; you can set the Pattern Overlay scale to 100-150% . Also you have to reduce the Fill to 0%
Convert the Embroidery 2 layer again into a smart object. Add the following layer styles to create the embroided effect. You can pick whatever color you like for the Color Overlay effect. You can also add a Ripple Filter ( Filter > Distort )
Go to the next layer, Embroidery 3 . Set the Fill to 0% and add these layer styles to create an embossed effect.
Make a selection using the Embroidery 1 layer (keep the CTRL key pressed and click on the layer thumbnail to make a selection). Go to Select > Modify and choose Expand by 15px.
Create a new layer below the Embroidery 1 layer and call it Pressed Effect . Fill the layer with any color; copy the layer styles from the Embroidery 1 layer and paste the styles to the Pressed Effect layer. Your embroided logo should now look like this:
For the final touches I have added some stitching and sewing effects using these stitch brush Photoshop files. I have also resized all the text layers to 110% to create a more realistic embroidery.
To make the jeans and embroidery effect more realistic you can add a crumpled paper texture or a simple paper texture in a new layer above all the other ones; set the blend mode to Overlay or Color Burn , depending on the texture. Set the opacity to a level that creates a soft result.
I have also increased the contrast of the entire image and sharpen the result. So here you have the embroided text effect made from scratch in Photoshop. Hope you like it.
The Embroidery and Sewing Photoshop Tool contains 4 Photoshop actions for creating embroidery and sewing effects with realistic results. The action works with text, shapes and also with graphic images .
The Embroidery and Stitching Creator contains 18 Photoshop actions and 6 bonus actions to help you with the creation process. This pack will allow you to create realistic embroidery, sewing and stitching effects out of any text, shape, raster .
Now you know how to create an embroidery text effect in just a few simple steps. The embroidered text effect looks great. You don't need an embroidery font, a sewing font or a stitch font. You can turn any regular font into a realistic embroidered text.
Long Shadow Flat Icon Photoshop Tutorial
Create a Floral Text in Photoshop with SuperSpray Plugin