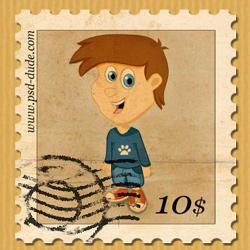
Learn how to make a Photoshop stamp effect from this easy to follow tutorial. In just a few simple steps you can obtain a realistic mail stamp and also a stamp effect that can be applied to any image.
First open in a new PSD file the photo that you want to transform into stamp. I have choosen my own blog mascot but it looks just as beautiful with any other image. Call this layer Photo Layer.
Photoshop is just one of the many options to make a stamp. Here's an alternative way to create rubber stamp effect online free .
I will start creating the Photoshop stamp effect by making the stamp border. Add a simple 1px #907e60 border to this photo. Open the layer style window and check Stroke , 1px, outside and the color, as I've said, is #907e60 . With the Rectangle Tool draw a white shape like in the image, call it Photo Frame Layer. Select the two layers and with the Move Tool selected press Align Vertical Center and Align Horizontal Centers so that you center the two layers. Merge the two layers and call the new layer, Stamp Layer. See here how to merge layers in Photoshop . Add some text that describes the stamp. I have choosed Georgia Font Family but you can always search for a stamp font on the internet. Select the Stamp Layer and all the Text Layers and merge them. You have to rasterize the text layers first otherwise the Merge will not work.
Now comes the step where we turn the photo into a stamp. Usually, multiple postage stamps are printed on large sheets of paper. Then using a tool for making stamp perforations the stamps are easily separated one from another. That's where the postage stamp perforations (little holes on the border of the stamp) come from. Let's make our own stamp perforations using Photoshop.
Select the Eraser Tool , choose a Hard Round Brush , size 15px.
Toggle the Brush Panel, select Brush Tip Shape and set the Spacing to 167% just like in the image.
Be sure you have the Eraser Tool and the Stamp Layer selected. Press SHIFT and simply draw a line around the edges of the stamp. The SHIFT pressed will help you draw straight lines in Photoshop (TIP: check out my detailed tutorial on how to draw lines in Photoshop including how to draw perfect straight lines in Photoshop ). You should know that you can't make this border with a single move. You have to make 4 different lines with the Eraser Tool.
Another method, much faster, is to use Work Paths . Press CTRL and click the tumbnail of the Stamp Layer. Now the Stamp is selected. With the Restangular Marquee Tool selected right click on the selection and choose Make Work Path .
Make sure you have the Eraser Tool selected. Go to the Path Tab and right click on the Work Path and choose Stroke Path . You will obtain a beautiful stamp effect.
If you would like to learn more about this technique, I've written an extensive guide about Stroke Path in Photoshop with lots of examples of what you can do with it, so check it out.
So the stamp is now looking good. For more imapct open the Layer Style Window and add Drop Shadow (black, multiply, 35 %, angle 120, distance 3, spread 0 and size 2 px)
To make the stamp effect more realistic I will apply a rubber stamp on the postage stamp. For that make another blank layer and call it Stamped Effect . We will use Work Path to create a nice realistic rubber stamp.
Select the Brush Tool and choose a 9px hard round brush, color black. Return to the Work path and choose Stroke Path like in the previous step, but this time, instead of Eraser Tool we will use the Brush Tool . A rubber stamp usually has concentric circles. It's very easy to make concentric circles in Photoshop: Resize the Work Path ( CTRL+T ) to 50% and reapeat the same procedure to obtain two black outlined circle . Create a new layer, called Black Lines and draw several black horizontal lines with the Brush Tool. If you don't know how you can check out my tutorial on Hot to Draw Parallel Lines In Photoshop . With the Black Lines layer selected go to Filter , Distort and choose Waves with the following settings. You will obtain beautiful curved lines . Resize the both layers and change their blending mode to Dissolve . Merge the two layers under one layer called Stamp Effect. To remove the areas that exceed the stamp simply select the Photo Stamp Layer(press CTRL and click the Photo Stamp Layer thumbnail). Select the Stamp Effect Layer and press Add Layer Mask . Now you see that a part from the stamp effect is now hidden.
For the final touches you can use the Eraser Tool , spatter default brush and erase parts of the stamp effect and lower the opacity of the layer to 80%. If you don't want to create the stamped effect yourself you can use one of the many Photoshop Stamp Brushes available for free on the internet
To obtain a vintage stamp look I have used an old paper mask. You can choose a beautiful vintage old paper . You can now create your own customized envelope stamps, stamp icons and so on, using the power of Photoshop. All our registered users can download the stamp PSD file for free.
If you're looking for a different Photoshop stamp effect, check out my other tutorial on how to make Custom Postage Stamps .
Also, here are some premium resources that you might want to try to create a great stamp effect customized and unique. Download the vector postal stamps in PSD fully layered formatand also the great rubber stamp generator .
How To Add Gif To Google Slides
How to Flip an Image in Photoshop