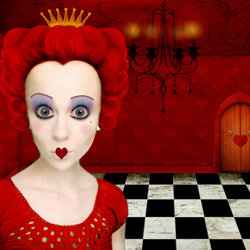
In this Photoshop tutorial I will show you how to create a photo caricature of the Red Queen of Hearts from Alice in Wonderland. As I remember, I was not a fan of the book Alice in Wonderland when I was little. But, as I grew older and after re-reading it, I started to see things a bit differently. The Alice in Wonderland movie was also a nice depiction of the book and so very artistic. So, I have decided to create my own Alice in Wonderland photo manipulation inspired by one of the official movie posters. The character chosen is the Red Heart Queen. I hope you will enjoy reading this Photoshop caricature tutorial!
Open a new document with the size 600 / 500 pixels. Open this beautiful photo Girl . Scale the image to 70%. There is no need to keep the background so carefully delete it. I usually use the Pen Tool (Paths) create a selection and than delete it.
OK now I want to sketch the room to give you an idea of what we are going to do next. Create a new group and put there all the 13 layers with the room walls , ceiling and wall details. Use the Pen Tool to draw this shapes.
In the image below each shape has a number. I will atach a color to each number :
For the three visible walls I will add a heart pattern . Download this pattern and load it into your Adobe Photoshop file. You can really use any pattern you like. If you want to make your own repeating patterns, check out my tutorial on how to make a repeating pattern in Photoshop . So for the shapes 2 , 4 and 5 open the Blending Options Window and add Pattern Overlay:
To make the walls more real I will add them a wall texture . Copy the texture and place it on the right side of the image . Duplicate the texture layer , flip it horizontaly and place it on the left side of the image. Select and delete the intersection area. Merge the two layers . Set the Blending Mode from Normal to Soft Light 100%. I will have to adjust the Brightness and Contrast as shown in the image below:
Use the Burn Tool to darken the corners af the walls. And than select the floor and ceiling and delete the texture from this areas.
Now copy the texture for the ceiling . Scale it to 70% and than rotate it 90 degrees. Than Skew the image :
Select the ceiling shape , select inverse and delete the extra texture. Set the Blending Mode of texture layer to Linear Burn.
Now let’s fix the floor. Draw a rectangle . Add a Pattern Overlay (download this chess pattern ) to this rectangle.
Duplicate this layer . Merge this two layers . Now we have to add Perspective to the resulted image:
Select the floor and delete the area that exceed the shape from the chess pattern layer. The next thing that we have to do is to copy texture for the ceiling , but this time we will apply it to the floor. Set the right perspective for the texture. Than set the Blending Mode to Darken 100%.
Add Brightness/Contrast like in the image :
For now leave the room as it is ; we will darken parts of the room later to give a little contrast. My main interest now is the chandelier. I have decided to use one from a beautiful Fancy Chandeliers Brush Set from DeviantArt. The only thing that I had to do is to download the set and choose one of the chandeliers (Chandeliere_21).
Copy this Wooden Door into the file. Crop only the door , than resize it to 30 %. Duplicate this layer three times.
Add a little red heart and darken the edges of the door. You should obtain something similar to the image above. Now I want to make a frame for the door. With the Pen Tool draw a shape, color #b00a08.
I have decided to darken the ceiling a little so I have changed the Brightness/Contrast of the Ceiling Texture Layer.
Draw a shape on the floor like in the image, color #0c0101.
Change the Blending Mode of this layer to Soft Light . Than rasterize the layer and with the Blur Tool blur the interior edges of the shape.
Now I want to turn the lamp on. With the Brush Tool , color # f5a114 , brush size 9 draw 4 lights on the lamp. Use Blur Tool , lower the opacity, draw again with a smaller size brush ( 2 px) to give the spark look. Than copy the Chandelier Layer , Distort it and add Gaussian Blur. You should obtain something like this:
The last part before adjusting the final details is to create the face caricature of the Red Queen Character. We start from this image :
The first thing that I want to do is to model the face into a heart shape. For that I will use the Smudge Tool to make the forehead a little bigger and to hide the hear. I do that because I want to atach a wig.
I have found this lovely photo and I will use the wig for my queen. With the Pen Tool (paths) trace the wig contour; we will than make a selection and crop it .
Crop the selected part of the wig and delete the other layer. Scale the wig to 50%.
Make a copy of the Wig Layer. Select the left part of the wig and copy it in another layer; than flip it horizontally and place it in the right part. Delete the right area from the initial Wig Layer. So we have three layers ; I will color each layer with a color temporarily.
Merge the gree and blue hair layers. Scale the resulted layer to make it a little bigger like in the image below.
Copy an area from the center of the yellow wig layer to atach it to the wig; that way it will not be visible the fact that there are two duplicated parts.
Erase the selection to blend perfectly. Use also the Dodge Tool for the same reason. Merge the selection with the Wig Layer.
Now let’s work with the Girl Layer. Go to Filter – Liquify and with the Forward Warp Tool adjust the face of the girl giving it the shape of a heart.
Use the Bloat Tool to make her eyes bigger.
Use the same tool Liquify – Forward Warp Tool to adjust the shape of the wig.
I want to erase the eyebrows and to draw two simple black lines. For that copy skin from the forehead, move it downwards and place the skin in the eyebrows area.
Delete with the Eraser Tool the areas that you don’t need. Keep only the skin that covers the eyebrows. Use the Blur Tool to blend all together and merge the two layers. To create new eyebrows for our photo caricature we will use the Pen Tool and Stroke Path. If you want to master this technique, I highly recommend my tutorial on stroke path in Photoshop . Create another layer – Eyebrows Layer. With the Pen Tool draw a line. Set the Brush Tool size 2 px , mode: normal , opacity 100% . Select the Pen Tool again, right click and choose Stroke Path. Press Delete.
Do the same for the other eyebrow. Create a new layer under the Eyebrows Layer. Call this layer White Skin and with the Brush Tool , opacity 100% , color white , cover the skin of the girl. Avoid the eyes area. With the Blur Tool blur the edges of the eyes from the White Skin Layer.
Change the blending mode of this layer to Soft Light 90%.
With the Burn Tool darken areas from the Girl Layer (where the forehead meets the hair , neck ,etc). Use lower opacity and change the range from shadows to midtones and vice versa.
With the Brush Tool , color #b891a6 makeup the girl eyes like in the image:
Blur the edges with the Blur Tool and than change the opacity of the layer to 60 %. Use the Burn Tool for the Eye Makeup Layer to darken the corner of the eyes.
Create a new layer above this one and to the same thing but this time the color is # 64a4d6.
I will now add Eyelashes . For that I have found this Eyelashes Brush Set . Load the brushes and choose the foreground color #0c0401. It is really simple to use . Just pick a brush (I choose 03.psd) and a size (35 px). Than rotate the eyelash to follow the edges of the right eye (bottom). Duplicate the layer, flip it horizontal and atach it to the left eye. Do the same for top eyelashes (brush 04.psd size 40px).
Now I will add Color to the Eyes . With the Brush Tool , size 12 draw two bullets in the eyes iris area . For this layer we have to add Inner Glow , Color Overlay and Stroke: Above this layer create another layer (opacity 55%) and draw two little white points (eyes highlight)
For the cheeks use the Brush Tool color #bb1928 , opacity 10% , size 12 px . Use Blur Tool to give a natural look. Use the same Brush Tool color #160703 , opacity 100% , size 3 px to draw a little mole on the right side cheek. The last detail of the makeup is the mouth. With the Custom Shape Tool draw a Heart shape in the mouth area. Choose the color # a60606. Set the blending mode of this layer to Multiply 100%. Add a stroke , color #500303 , size 1px.
The wig looks nice with this white tone but the queen from our fairytale has the hair red. So return to the Wig Layer and add Color Overlay , blend mode Darken , opacity 100% , color #ff0000. Use the Burn Tool to give the wig a little contrast. You can also use the Dodge Tool to add highlights to the hair.
Now let’s colorize the blouse. For that return to the Girl Layer and go to Image – Adjustments – Replace Color. Select with the Eyedropper Tool the color you want to replace and change the settings of Hue , Saturation , Lightness like in the image:
Use the Eraser Tool and the Burn Tool to adjust the visible imperfections.
What is a Queen without her Crown? I have found this really nice set of Crown Brushes . Create a new layer Crown. Add this 184 px size Crown , color #f2b111.
As you can see we have only the contour. I want to give it a nice gold tone. So for that I have to trace the shape of the crown with the Pen Tool , color # d97a00. Add seven little dots, resize all the layers and this is the Crown. You can of course burn and dodge the crown or even apply a gold texture. If the crown is to bright you can lower the opacity of all layers to 80%. If you want to can play around with the settings to create a more realistic gold crown. For example, you can choose one of the Photoshop gold styles that I collected from the web. But, for this caricature Photoshop tutorial I think the golden crown looks good enough.
Create a copy of all the layers and in this image use the Burn and Dodge Tool to add light or shadow in some areas of the room (for example dodge the ceiling area where the light falls, darken corners of the room , the hair of the queen etc.) This is my final result ! you can of course play with different colors , apply textures the limit is only your imagination!
If you enjoyed this tutorial, also check out one of my other Alice in Wonderland Photoshop tutorial I've made.
Fairytale Photo Manipulation - The Mermaid
Alice in Wonderland drinking tea in the royal courtyard