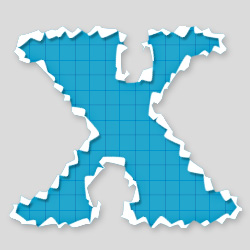
Learn how to obtain a realistic torn paper effect in Photoshop using torn brushes and simple layer styles . You will have to download our torn paper brushes that you can use to create any torn paper effect in notime.
I am planning to make an action out of this tutorial so that you can obtain this torn paper edge effect in a matter of seconds from any layer. So stay tune.
Here is a preview of the torn paper text that we are about to create in Photoshop. We will only need some custom made brushes and Work Path basic knowledge. You can apply this effect to other shapes not only text layers.
Start with a simple text, the font is not important, I have chosen Poplar Std that is a font that comes with Photoshop CS4. The color used is #ecd86b but you can use any color you want, except white.
I have also added a Pattern Overlay using these notebook patterns . Call this first layer Paper Text .
Select the text shape( press CTRL and click on the Paper Text layer thumbnail ) and turn the selection into a Work Path .
Create a new layer called Torn Edges 1 . Set the Foreground Color white and pick the Brush Tool . From the list of brushes choose the Torn Paper Brush 1 ; you can download the ABR file at the end of this tutorial.
Pick the Path Selection Tool , right click on the selection and choose Stroke Path . From the list choose the Brush Tool .
You can now remove the Work Path . You should obtain these torn edges or something similar.
Select the Paper Text layer again. Press SHIFT+CTRL+I to Inverse Selection and press delete to remove the selection from the Torn Edges 1 layer.
Our text should now look like this:
Select the text shape again, Expand the selection by 3px and turn the selection into a Work Path .
Create a new layer called Torn Edges 2 . Set the Foreground Color black and pick the Brush Tool . From the list of brushes choose the Torn Paper Brush 2 .
Make a selection from the Torn Edges 2 layer and remove it from the Torn Edges 1 layer. Hide the Torn Edges 2 layer to see the result.
Use the same selection, press SHIFT+CTRL+I to Invert and add it as Layer Mask for the Paper Text layer.
Duplicate the Torn Edges 1 layer and call it Shadow Effect layer. Place it below the Torn Edges 1 layer. Reduce the Fill to 0% and add Drop Shadow .
Create a blank layer and merge it with the Shadow Effect layer, that way the shadow gets rasterized. Now select the Paper Text one more time, select inverse and remove the selection from the Shadow Layer .
You can even add some Layer Style effects to the Paper Text layer like Drop Shadow or Inner Glow for example. Here is my final result for Torn Paper Text made from scratch in Photoshop, using torn brushes .
To make this tutorial work you have to download the two brushes used to create the torn edge effect, so here is the ZIP file(1.38 kb) .
You might also like this free ripped paper texture or to try our premium Photoshop plugin that allows you to create torn paper corner for photo effects .
Torn Photo Corner Photoshop Action by graphicriver
Torn Paper and Tear Effects Photoshop Actions by graphicriver
If you are looking for newspaper letters, cut out letters or magazine letters, you can use these online text effects.
Photoshop Rose Text Effect Tutorial
Fairy Tale Landscape in Photoshop