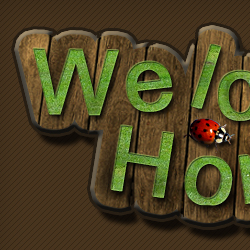
In this Photoshop tutorial I will show you a simple way to create a beautiful rustic text effect . First of all we will need grass texture and of course some wood texture to make this text effect.
So I hope you will enjoy reading this grass text effect or wood text effect it depends on how you want to call it. If you decide to practice it upload your result!
Open a new psd file. Use the Pen Tool to draw a simple vector shape like in the picture below. Be careful to choose Paths from the top bar; this way your shape will not be visible and the most important it will help you write a custom aligned text. Click on the shape to write the text following the path. If the text is perfect horizontal it is not good try again!
After you've drawn the shape with the Horizontal Type Tool write a simple text "Welcome". The settings for the text are:
The color is not important because we will apply a texture anyway.
If you want to move the text along the path simply drag one of the points from the picture below and the entire text will follow the path. If you want to modify the shape than choose Convert Point Tool from the toolbar and click on the vector points and move them up /down/right/left. It works just like another vector shape. You can Add points, Delete Points, etc.
Write the text "Home" with the same settings and follow the exact same steps. You don't have to make the exact shapes I did; you can do better! Mine for "Home" text is this:
Now we have two text layers Welcome and Home. Select this two layers and right click Rasterize Type and than right click Merge Layers . Call this new layer Text.
Duplicate Text layer and call it Text 1.
Select Text layer and right click and choose Blending Options and check stroke:
You should obtain something similar to this.
Create a new layer above the Text layer. Set the Foreground color red. With the Brush Tool cover the white area between the 2 text. Merge the 2 layers : Text layer and Paint layer. Call this new layer Wood.
Lets make a little inventory. We have 2 layers: Wood and Text 1.
Right click on Wood Layer and make the following settings for Color Overlay and Stroke:
The color is #ab8753.
The color is #46433c. Now you should have this image on your screen:
I've searched the internet for nice wood texture and I found this very beautiful one
Copy the texture and place it above Wood layer. Press CTRL and click the Wood layer thumbnail. You will see a selection of this layer. Go to Wood texture layer and press CTRL+C and CTRL+V. You will se that a new layer appeared. Call this new layer Wood Texture layer and delete the initial texture. Set the Blending Mode for this layer from Normal to Multiply 100%.
I want to apply a new stroke to this layer so for that I need to duplicate Wood Layer and than to merge the 2 wood layers. The result is that the new created layer has no stroke checked on Blending options.
So right click on the new Wood layer, choose Blending Options and check Drop Shadow(color # 000000), Bevel/Emboss(Highlight color # a6824b, Shadow Color # 000000), and Stroke(Color # 281f14) like in the pictures below:
I will work now with Text1 layer the one that has the green text. We will apply a grass texture to it. For that copy this nice grass from flickr . Delete the parts that is not grass and duplicate several times and move it until you obtain a big grass area so that it covers the text.
We will do something similar to what we did to wood texture. Press CTRL and click the Text1 Thumbnail and than go to Grass texture layer and press CTRL+C and CTRL+V. Call the new layer Grass texture.
For Grass layer make the following settings in the Blending Options window: drop shadow and Bevel and Emboss.
Copy this nice lady bug and crop it. Resize it and place it on the wood fence.
Set the Foreground Color to # 49351e and draw a rectangle below all the layers.
Did you notice the red circles? This is where I will use Eraser Tool brush size 2-4%, opacity 100% to give the impression of continuity to the fence lines. I will have to delete parts from Wood Layer and Wood Texture Layer.
For the final touch with the Burn and Dodge Tool I have darken/lighten parts from the Wood layer and Grass Texture Layer.
This is the final result!
The Rusty Rainbow Killed the Rabbit