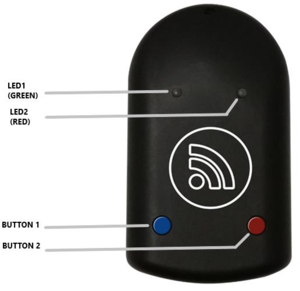
Netronix NBL-2 - wireless Bluetooth® RFID reader with additional buttons.
NBL-2 is great in these use cases:
Important Note Teltonika Telematics does not resell these accessories, official manufacturer has to be contacted to buy them.
For the NBL Tools application, contact the Netronix NBL manufacturer.
First, you have to make sure that NBL-2 firmware version is updated to 1.3.
If the firmware version is lower than 1.3, it is necessary to update the device.
Go to NBL Tools application -> Device -> Characteristic -> Device Information Service -> Firmware Revision String.
Note: If the firmware version is 1.1 or 1.0, it is not possible to update it.
If it is 1.2, then update NBL-2 according to these steps:
1. Run the NBL Tools application
2. Update the firmware database (tap: Manager Firmware -> Update the database -> Start). Select NBL-2 and check 1.3 firmware version.
3. Back to the main menu.
4. Tap the Device option.
5. Wake up the device - for example, by applying a card to it.
6. Select the device from the list, then select Update firmware from the drop-down menu and press the Start button.
7. Correct firmware update will be signaled by device start-up led message.
2. Power OFF /Reset to default settings
To set factory defaults and unpairing both buttons must be pressed for 5 seconds additionally button 1 (blue) must be pressed first. It is also factory/transport configuration.
3. Power ON (After Powered OFF)
When device have defaults settings, reader waits for button then sends advertising packet for 50 seconds and blinks LEDs. First connection in this state is pairing process. Paring mode used: No Pin.
When the device is paired, the pairing mode is changed to pairing using the PIN. This prevents the pairing of additional devices
This functionality is available from firmware version FMB.Ver.03.28.05.Rev.04
Setting up NBL-2 device to connect with FMB device.
Go to Teltonika configurator -> Bluetooth® 4.0 and set it up like it shown in this screenshot (MAC address will depend on your particular NBL sensor):
Mandatory setting condition: Non Stop Scan
Then go to I/O settings:
Make sure to enable the BLE RFID #1 parameter (ID: 51740). We would recommend to set the operand to „ On Change “.
Make sure to enable Private/Business mode in Trip/Odometer settings. It can be done using SMS commands or a configurator. Not every device has these parameters visible in the configurator, therefore they should be configured via SMS commands. It can be done by sending setparam SMS (how to send SMS commands: https://wiki.teltonika-gps.com/view/FMB120_SMS/GPRS_Commands ). Set it to High or Low priority (parameter ID: 11850). Enable triggers as NBL-1 Button1 or NBL-1 Button2 (parameter ID: 11811).
Don't forget to set up data masking in Private mode if necessary.
Don‘t forget to save all these changes to the device and you are ready to test the NBL-2 sensor.
More information about Private/Business Driving Mode Functionality.
1. Using the Configurator
Power up the FMB device, connect it to PC and open Configurator application. Configure devices as shown above.
When the RFID card is not enabled, the BLE RFID #1 parameter (AVL ID: 451) will show a specific value.
Example (Status tab => I/O Info):
When the RFID card is activated (card touched to NBL-2 and followed by two beeps) BLE RFID #1 parameter should look like this:
2. Using the Terminal application
Power up the FMB device, connect it to PC and start logging it into the Terminal application.
IO ID[451]: 0x0000000000000000
IO ID[451]: 0x0004193EF2576680
When Private/Business mode is enabled (Button1 or Button2 is pressed):
NBL-T data is being read via broadcast packets only. The packet structure is described below:
GeneralDiscoverable,
• Motion – if 1, sensor detect movement
• Card – if 1, the ID is read
• Btn1 – state of button 1
• Btn2 – state of button 2
Total packet length: 31B.