QuickTime is a free and versatile media player on Mac. Not only can you use it to play movies, view images, it also allows you to record screens and output high-quality videos.
However, there is a catch when using QuickTime for screen recording with audio, since QuickTime by default only allows you to record screen with Microphone audio. That means you can only record an authorized YouTube video without sound.
So, in this post, we will walk you through how to use the QuickTime screen recording feature to record both screens with system audio and Microphone audio (or voiceover) and how to combine QuickTime screen recording with your webcam for how-to tutorials. Besides, we also offer you a free QuickTime alternative to capture your screen. Let’s dive right into it.
To be able to use QuickTime to record your screen with internal or system audio, firstly you need to install Soundflower, a Mac OS X system extension that allows the QuickTime to receive the audio of any audio application on your Mac. Follow the link to download Soundflower for free .
With that in mind, let’s get down to the next step:
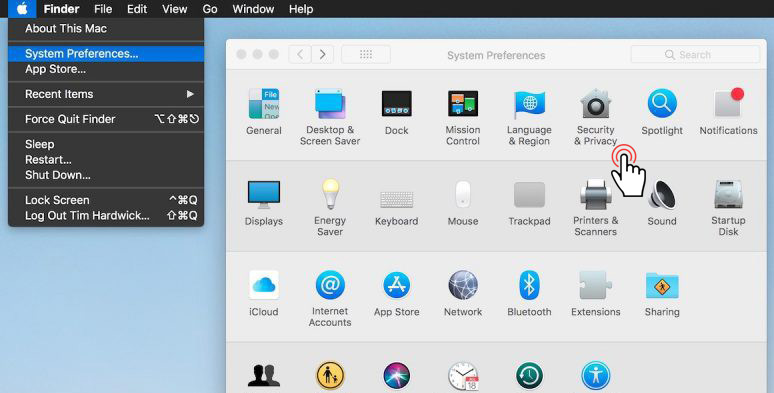
Click on App icon > System Preferences > Security & Privacy > enter “user name” and “ password” to unlock security & privacy > allow Soundflower to be installed on your Mac.
Allow Soundflower to be installed on Mac
Use keyboard shortcuts “Command + Spacebar” to open the search bar > enter “ Audio MIDI Setup” and open it > click the “+” icon at the bottom to the left and select “Create Aggregate Device” > check the box of Built-in Microphone and Soundflower (2ch)
audio-midi-setup-mac
Go back to the same pop-up window, click the “+” icon again at the bottom > choose “Create Multi-output Device”> tick both the boxes of “Built-in Output” and “Soundflower(2ch)”
Head to System Preferences > Sound > Output > Select “Screen Record with Audio” and Type (Aggregate Device). Check the 5 best screen recorders for Mac .
Once you are done with the audio setup, you can start recording both your screen and audio with QuickTime player now.
Open up QuickTime > File > New Screen Recording > click the drop-down menu next to the recording button > select Soundflower (2ch)
Launch new screen recording on QuickTime
Press the recording button. Then, a pop-up will appear saying “Click to record the full screen. Or drag to record part of the screen. End recording by clicking the stop button in the menu bar”
A pop-up window for screen recording
Once you decide which part of your screen for recording. Then hit “Start Recording” button. The QuickTime will automatically record your screen and audio of any application or chrome tab on your screen.
One thing to mention is that during the recording, you won’t hear the audio.
To end the screen recording, you have two options: one is to go up to the QuickTime’s menu bar on the top and click on the black recording icon.
Press the “stop button” to end screen recording
The other way is to use the keyboard shortcuts: “Command + Control + Escape”.
As you stop the recording, your recording should be popping up on your screen for playback.
Click on App icon > System Preferences > Sound > OutPut > click “Internal Speakers”. Then you can playback your recording with both video and audio on now.
To save your recording, you can go to QuickTime menu bar> File> Save. Then choose a path and folder to save the recording.
To record your screen with your voiceover or audio narration, QuickTime offers you a much easier way to do so. All you need to do is set up your Microphone audio recording mode, then record your screen.
Open your QuickTime > File > New Screen Recording > click the drop-down menu beside the recording button > select either Internal or External Microphone for the voiceover while recording.
Select internal or external mic for audio recording
Press the recording button > you can click and drag to create a recording area on your screen or click the screen to record your entire screen > hit “Start Recording” button. Then a black recording icon will appear on the top-right corner of QuickTime menu bar.
Hit the black recording icon on the top-right menu to stop recording or use “Command +Control + Escape. Once your recording is stopped and the recorded video will pop up automatically on your screen.
Then, you can click on the red close button and choose the hard drive and folder to save your recording.
If you want to record your screen for how-to tutorials with your webcam in a corner of your screen, QuickTime may also fulfill your needs. Check the 3 best screen recorders with facecam .
Launch QuickTime Player > File > New Movie Recording. Then your webcam should be activated and pop up on your screen. Then hit the drop-down menu next to the recording button to choose the webcam, microphone, and video quality you prefer.
Set up the camera and audio of movie recording QuickTime
Next, shrink down your webcam to a smaller size and place it to let’s say the right bottom corner of your screen. Ready to be recorded.
Go to top menu bar > File > New Screen Recording. Then the QuickTime screen recorder will appear. Click the drop-down menu next to the recording button to select your microphone.
Press the recording button on QuickTime screen recorder. Then click and drag to make a selection of your screen recording including your webcam.
Make sure your webcam is not blocked by a web browser
Hit the black recording icon on the top-right menu bar, then the recording will be stopped. You can go to the top-left menu bar > File > Save.
Well, though you can use built-in QuickTime on Mac for screen recording, you do have to go the extra mile to download and add Soundflower extension to capture both your screen and audio while the complex setup can be daunting to newbies.
So, we are glad to offer you a free alternative to QuickTime, i.e. the RecordCast, an all-in-one screen recorder and video editor. The biggest benefit is that you don’t have to download anything. You can record the screen online with internal audio, mic audio and webcam in just a few clicks. Besides, you can edit your recording in no time.
Use RecordCast to record screen on Mac
Open the RecordCast.com > hit “Start Recording” button > select video recording mode: Screen+Webcam; Screen Only or Webcam Only > choose audio recording mode: Microphone + System audio; Microphone; or System audio; you may also select your external Mic as well.
Customize the video and audio recording mode
Press the Start Recording button > Select from recording “Your Entire Screen”, “Application Window” or any “Chrome Tab” > click the box of “Share Audio” on the bottom left pop-up > hit “Share” Button.
Choose a specific area for screen recording
Then you will be directed to a Chrome tab or application like a video for screen recording. Currently, the maximum time for recording is 30mins. Yet, you can resume a new recording with unlimited time.
Press the “Stop” button on the browser or application being recorded. Then go back to RecordCast web page, you can preview the recording and hit “Edit” button for quick editing in a user-friendly video editor.
Edit your recordings in RecordCast’ video editor
You can freely trim your recording, customize text effects, dynamic elements, overlays and background colors, etc. Finally, you can download the edited recording in MP4 format (1080p) to your hard drive. Super easy and efficient.
Using QuickTime for screen recording on Mac can be both delightful and disheartening to different users since its internal audio recording feature is only available by adding an external extension—Soundflower.
If you want to record your screen on Mac in an easier way, using RecordCast can be a viable option. Whatever you choose, hopefully, you find your article useful, and don’t forget to share it with your friends using Macbook screen recording for daily use.
How to Record Yourself and Your Screen at the Same Time on PC/Mac
How to Record Any Chrome Tab with Audio in Clicks
8 Best Free Screen Recorders with No Watermark
Top 19 Tips and Tricks to Record Presentations as a Video
How to Record Facebook Video Calls with both Video and Audio on Desktop, iPhone, Android
How to Record Google Meet for Free Gmail Users (PC & Mobile)
Best Way to Record Gameplay on PC 2021
Best Ways to Record an Interview with High-quality Audio and Video on Mac